Free All in One Audio Editor & Converter
Looking for a free online audio editor? Trim, reverse, convert to MP3, and boost volume instantly in your browser with our 100% offline audio studio.

Table of Contents
🎵 Audio Studio Pro
🥁 Bass Boost — Amplifies low frequencies (110Hz) for deeper, punchier bass. Applied with FFmpeg bass=g=10 filter.
📏 Loudness Normalize — Sets integrated loudness to -16 LUFS (EBU R128). Perfect for podcasts, YouTube uploads, and consistent playback.
🌊 Echo / Reverb — Adds a natural 1-second echo with 0.3 decay. Uses FFmpeg aecho=0.8:0.9:1000:0.3.
⏪ Reverse — Plays the entire track backwards. Great for creative effects and hidden message detection.
🔉 Fade In — Smooth 3-second volume ramp at the start of the track using FFmpeg afade=t=in:ss=0:d=3.
🔈 Fade Out — Smooth 3-second volume drop at the end of the track. Applied to the last 3 seconds automatically.
🤖 Robot Voice — Lowers sample rate to 80% + adds metallic echo. Transforms any voice into a robotic tone.
🐿️ Chipmunk — Raises sample rate to 150% for a high-pitched, sped-up chipmunk effect. Classic audio fun.
🤫 Cut Silence — Detects and removes silent gaps longer than 1 second (threshold: -30dB). Ideal for podcast cleanup.
🎧 8D Audio — Creates an immersive panning effect using apulsator=hz=0.125. Requires stereo headphones for full effect.
〰️ Tremolo — Applies a 5Hz trembling amplitude modulation for a wavering musical effect.
Convert to MP3/WAV/OGG, Trim by MM:SS, adjust Volume up to 300%, shift Pitch, change Speed, apply Bass Boost, Normalize to -16 LUFS, add Echo, Reverse, Fade In/Out, Robot Voice, Chipmunk, Cut Silence, 8D Audio, and Tremolo — all inside a single FFmpeg WASM engine that never touches a server.
No header snippet required. The tool dynamically injects the FFmpeg library script itself, then shows a staged loading progress bar — from “Fetching WASM core” through “Compiling WebAssembly modules” to “Engine Ready”. Users see exactly what is happening during the ~30MB one-time download rather than a frozen “Please Wait” state.
Choose MP3, WAV, or OGG as your output before hitting 🚀 PROCESS AUDIO. The sidebar File Info panel shows the loaded file’s name, detected duration, input size, currently active tool, and chosen output format — updating live as you switch tools and formats without reprocessing.
Watch the purple loading bar fill from 0% to 100%. When the badge changes to “✅ Engine Ready” and the upload button unlocks to “📁 Select Audio / Video”, the FFmpeg WASM engine is fully compiled and ready.
Click “📁 Select Audio / Video” and pick any MP3, WAV, M4A, OGG, FLAC, or MP4 file. The Original audio player loads your file immediately and the File Info sidebar shows name, duration, and file size. Use “💡 Load Sample” to test with a generated 440Hz tone.
Search tools by name using the search box (e.g. type “echo” or “pitch”) or click any of the 16 tool buttons. Adjust the settings that appear — bitrate selector for Convert, MM:SS inputs for Trim, range sliders for Volume/Speed/Pitch. Then pick Output Format: MP3, WAV, or OGG.
Click “🚀 PROCESS AUDIO”. Watch the progress bar and processing log update in real time. When complete, the Output player loads the result automatically and the green “⬇️ Download” button appears with the file size. Use “🔄 Reset Studio” to start fresh for your next track.
Last updated: June 2026
🔴 How FFmpeg WASM Runs Audio Processing Inside Your Browser
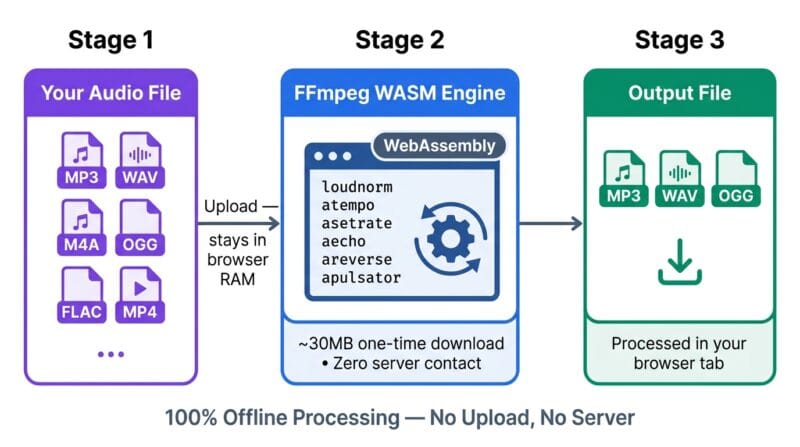
Most online audio tools send your file to a server. A backend process runs FFmpeg, the output gets stored temporarily, you download it, and the server logs your file. This tool works in the opposite direction. The entire FFmpeg binary — the same command-line engine used in professional broadcast production — is compiled to WebAssembly (WASM) and executed inside your browser tab. No file ever leaves your device. The processing log you see in the dark console panel at the bottom of the tool shows the exact FFmpeg commands running in real time — not simulated output, actual engine messages.
The engine uses a single-thread safe build of FFmpeg core (@ffmpeg/core-st). This specific build avoids SharedArrayBuffer — a browser API that requires special COOP/COEP HTTP headers which most shared WordPress hosting setups don’t send. The single-thread build sacrifices parallel processing speed for universal compatibility. On a typical 5MB MP3 file, operations like Normalize or Bass Boost complete in 8–20 seconds depending on your device’s CPU speed. Trim with stream copy (-c copy) is faster since it skips re-encoding entirely.
🟡 What Each Audio Tool Does — The FFmpeg Filter Behind Every Button
Every tool in the grid maps to a specific FFmpeg audio filter or operation. Understanding what runs under the hood helps you chain tools effectively and predict the output quality.
🟢 Convert, Trim, and Volume — The Foundation Tools
Convert to MP3/WAV/OGG re-encodes your source file at the bitrate you select — 320kbps for archival quality, 128kbps when file size matters. WAV output uses pcm_s16le (uncompressed 16-bit linear PCM), which is what audio editors like Audacity and DaVinci Resolve import without issues. OGG uses libvorbis -q:a 4, producing roughly 128kbps variable-rate output.
Trim takes Start and End times in MM:SS format. The tool auto-fills the End Time field with your file’s exact duration when the audio loads, so you don’t need to know it in advance. FFmpeg runs -ss [start] -t [duration] with a -vn flag to strip any video track. If you’re trimming a long MP4 to extract a short audio segment, this is the fastest path — the seek is frame-accurate.
Volume uses volume=[factor] where the slider range of 0–300% maps to 0.0–3.0. Setting 200% doubles the amplitude — equivalent to +6dB. Going beyond 200% risks clipping on tracks that are already loud. Run Normalize first, then boost Volume if you need more output level without distortion.
🟢 Effects Tools — Normalize, EQ, Spatial, and Voice Changers
Normalize runs loudnorm=I=-16:TP=-1.5:LRA=11 — the EBU R128 loudness standard used by Spotify, YouTube, and broadcast television. It brings integrated loudness to -16 LUFS without clipping. This is the single most useful tool for podcast cleanup, YouTube uploads, and making multiple audio clips sound consistent next to each other. Run it as the final step before download.
Bass Boost uses bass=g=10:f=110:w=0.6 — a shelving EQ that boosts frequencies around 110Hz by 10dB with a moderate Q. This targets the sub-bass and bass range without muddying the mid-range where vocals sit. 8D Audio applies apulsator=hz=0.125, a stereo panning oscillator that sweeps the stereo field at 0.125Hz (one full cycle every 8 seconds). It needs stereo headphones to perceive — mono speaker output collapses the effect entirely. Cut Silence uses silenceremove=stop_periods=-1:stop_duration=1:stop_threshold=-30dB, which strips any gap longer than 1 second that falls below -30dB. Perfect for recorded interviews, online meetings, and podcast raw recordings where dead air between speakers adds unnecessary length.
The Pitch Shift filter uses asetrate=44100*[factor],aresample=44100. This changes the sample rate to trick playback speed, then resamples back to 44100Hz. A factor of 1.5 raises pitch approximately a musical fifth. Unlike a true pitch-shifting algorithm (which preserves tempo), this method also speeds up the audio — the same trade-off used by the Chipmunk and Robot Voice effects. For tempo-independent pitch shifting you’d need a WSOLA or phase vocoder algorithm not available in this FFmpeg build. Our Audio Studio Pro tool applies these filters in sequence — so if you need to normalize AND add echo, process the file twice: normalize first, then re-upload and apply echo.
🟡 Choosing the Right Output Format — MP3, WAV, or OGG
The Output Format selector at the bottom of the settings area changes the FFmpeg output container and codec for every tool, not just Convert. If you apply Echo and select WAV, you get an uncompressed echo-processed audio file. If you select OGG, you get a Vorbis-encoded version. This matters depending on where the output goes next.
- 🔵 MP3 — Best default for sharing, uploading to YouTube/SoundCloud/Spotify, or sending to someone without specifying a player. Lossy compression. At 192kbps, quality loss is inaudible on most consumer speakers and headphones.
- 🟠 WAV — Choose this when the output goes into a DAW (Audacity, GarageBand, Reaper, DaVinci Resolve). Uncompressed PCM means no generation loss when you re-process. File sizes are large — a 3-minute track at 44.1kHz 16-bit stereo is ~30MB.
- 🟣 OGG Vorbis — Open-source lossy format with slightly better quality than MP3 at the same bitrate. Supported natively in Chrome and Firefox. Good for game audio assets, web apps, and projects that avoid MP3 licensing concerns. Not supported in Safari without a polyfill.
🟢 Tool Search, Load Sample, and Reset Studio
The search box above the tool grid filters all 16 tools by name in real time as you type. Type “fade” to show Fade In and Fade Out. Type “voice” to show Robot Voice. This matters on mobile where the full grid scrolls off screen. The 💡 Load Sample button generates a 2-second 440Hz sine wave tone using the Web Audio API — a pure tone with no harmonics, useful for testing effects like Echo, Tremolo, and 8D Audio without uploading a real file. You can read more about browser audio processing techniques in our screen and audio capture guide.
🔄 Reset Studio clears the loaded file, resets all inputs to defaults, hides the download button, and wipes the processing log — without reloading the page. The FFmpeg engine stays loaded in memory, so your next processing operation starts immediately. Use this between tracks in a batch session to keep the tool clean. If FFmpeg runs into a corrupted file or a format it can’t handle, Reset Studio is the correct recovery step — it resets the isProcessing flag that prevents double-processing and gives the engine a clean state for the next run.
Why does the engine take so long to load the first time?
The tool downloads ~30MB of FFmpeg WebAssembly binary from a CDN on first use. This is a one-time download per browser session — subsequent uses in the same tab start processing immediately. The purple loading bar shows real-time progress through each stage: library load, WASM fetch, compilation, and engine init.
Does this tool need a separate header snippet installed in WordPress?
No. The v4.0 tool dynamically injects the FFmpeg library script itself using document.head.appendChild(). It no longer depends on a separate header Woody snippet. If you already have the FFmpeg header snippet installed, it still works fine — the tool detects the existing library and skips the download step.
Can I process the same file through multiple effects in sequence?
Yes, but not in a single pass with this tool. Download the output from the first operation, then click “🔄 Reset Studio”, re-upload the downloaded file, and apply the next effect. The Reset Studio button keeps the FFmpeg engine loaded so there’s no wait between operations. For a full multi-effect chain, process in this order: Trim → Normalize → effects.
What’s the difference between Speed and Pitch Shift?
Speed changes playback tempo using atempo, which adjusts timing without changing pitch — a 1.5x speed file plays faster but stays in the same key. Pitch Shift changes the sample rate (asetrate), which alters both pitch and speed simultaneously. A 1.5x pitch factor raises the key by roughly a musical fifth but also shortens the track duration.
Why doesn’t the 8D Audio effect sound spatial on my speakers?
8D Audio uses a stereo panning oscillator (apulsator) that sweeps audio between left and right channels. Mono speakers or phone speakers that play both channels through one driver will collapse this to a flat volume pulse effect. Use stereo headphones — the spatial effect becomes clearly audible when each ear receives a separate panned signal.
My audio file processes but the output sounds distorted. What went wrong?
Distortion usually means the output volume is clipping. This happens when you apply Bass Boost or Volume boost to a track that’s already at maximum level. Fix it by running Normalize first — it brings the track to -16 LUFS with -1.5dB true peak headroom — then re-upload and apply your volume or EQ effect on the normalized file.
What file formats can I upload?
The tool accepts MP3, WAV, M4A, OGG, FLAC, and MP4 video files (it strips the audio track automatically using -vn). The browser file picker accepts audio/*,video/*, so any audio or video format your OS recognizes will appear in the picker. FFmpeg inside the WASM engine supports additional container formats beyond what the picker label lists.
Is WAV output really lossless compared to MP3?
WAV output from this tool uses PCM encoding — no lossy compression applied at the output stage. However, if your source file was already an MP3, the original MP3 artifacts are preserved in the WAV. WAV doesn’t restore information that MP3 encoding already discarded. For true lossless audio, your source needs to be FLAC, WAV, or another uncompressed format.
Does resetting the studio clear the downloaded output file?
Clicking “🔄 Reset Studio” hides the download button and clears the output player, but it does not revoke the Blob URL immediately — the browser holds the processed file in memory until you close or refresh the tab. If you already clicked the download link before resetting, your file is safely saved to disk regardless of what the tool UI shows afterward.