Free SVG to PNG Converter – High Quality Offline Rasterizer
Need a fast SVG to PNG converter? Convert SVG vector graphics to high-quality PNG, JPG, or WebP offline instantly with custom sizing and transparency.
Table of Contents
Got an SVG that you need as a PNG for a document, an email or a platform that will not accept vector files? This converter rasterises an SVG to a PNG in the browser, letting you set the output size so the result is as sharp as you need. Because SVG is resolution-independent, you can export the same icon or logo at any pixel size without it going blurry, which is the main reason to convert on demand rather than saving a fixed image. It suits designers exporting assets, developers preparing icons, and anyone handed an SVG by a tool that another app will not open. The file is processed entirely on your device using the browser canvas, so a logo or a client asset is never uploaded to a conversion site, and it keeps working with the network switched off once the page has loaded.
🎨 SVG Studio Pro
SVG, PNG, JPG, WebP — 100% Offline Processing
Rasterize, SVG Editor, Filters & FX, and Optimize tabs in one tool — convert SVG to PNG/JPG/WebP, edit source code with live preview, apply 8 filter presets, and batch export in a single session.
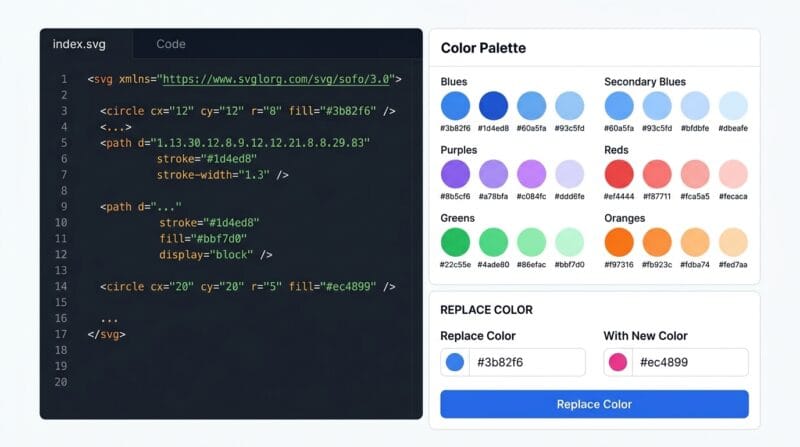
Automatically scans your SVG and displays every hex color as a clickable swatch. Pick any color and swap it site-wide in one click — perfect for rapid logo rebranding and theme changes.
Generate a complete Favicon Pack (16×16 to 512×512), Social Pack (OG, Instagram, FB Cover, Twitter), or Icon Sizes set (16px to 256px) — all files download automatically in one batch action.
Drag & drop your SVG or image file onto the drop zone, or click 💡 Load Sample to start immediately with a demo SVG.
Choose 🖼️ Rasterize to export as PNG/JPG/WebP, ✏️ SVG Editor to edit code or swap colors, 🎨 Filters & FX to apply effects, or 📐 Optimize to minify and batch export.
Set output dimensions using Quick Size Presets or custom width/height, choose format, adjust quality slider, pick a filter preset or tune sliders manually.
Hit ✨ Render to Image, 📥 Export with Filters, 📄 Download SVG, or choose a Batch Export Pack. All files save directly to your device.
Last updated: June 2025
🔴 SVG Rasterization vs Vectorization — What Actually Happens Inside the Browser
SVG files are mathematical instructions. No pixels. When you open an SVG in a browser, the rendering engine (Blink, Gecko, WebKit) interprets those path commands and draws them fresh at whatever size you requested. That’s why an SVG icon looks crisp at 16×16 and still crisp at 4096×4096 — the same math, different output canvas.
Rasterization is the reverse: turning those instructions into a fixed grid of pixels. You decide the canvas dimensions. The browser draws the SVG onto an HTML5 Canvas element at that exact resolution, then you read the pixel data out as PNG, JPG, or WebP. That’s exactly what the Rasterize tab does here — no server, no ImageMagick, no Inkscape. Pure Canvas API running in your tab.
The difference matters for your workflow. You’d rasterize when you need a PNG favicon, an OG image for social sharing, or a JPG thumbnail for email. You’d keep the SVG when the asset goes into CSS, React, or any context where infinite scalability matters. SVG Studio Pro handles both directions — and the Format Guide in the sidebar tells you exactly when to use each.
🟡 The SVG Editor Tab — Live Code Editing, Color Swapping, and JSX Export
Most free SVG converters give you a download button and nothing else. The SVG Editor tab is different. It exposes the raw SVG source in a live code editor with dark syntax styling. Edit a viewBox, remove a redundant <defs> block, fix a broken gradient ID — hit Apply and the live preview updates instantly. No page reload. No re-upload.
🟢 Color Palette Extractor — One-Click Rebranding
When you load an SVG, the tool scans every fill, stroke, and stop-color attribute for hex values and renders them as clickable swatches. Click a swatch and that hex populates the “Replace Color” picker. Set your new color. Hit 🔄 Replace Color. Every instance of that value across the entire SVG source gets swapped in one pass. Need to undo? Hit ↩️ Revert to restore the original.
- 🔵 Works on multi-stop gradients — finds colors inside
stop-colorattributes too - 🟠 Handles both quoted styles:
fill="#2563eb"andfill:#2563ebin inline CSS - 🟣 Revert button restores the original SVG colors without needing to re-upload
The Beautify button reformats compressed SVG source into indented, human-readable markup. The Minify button does the opposite — strips whitespace and collapses the source to a single line. Both are lossless. Neither removes paths or shapes. After editing, use Copy as JSX to get a React-compatible version with all hyphenated attributes converted: stroke-width becomes strokeWidth, fill-rule becomes fillRule, and so on.
🟢 Filters, Optimization, and Batch Export — The Production Workflow
The Filters & FX tab applies CSS filter effects to your SVG at render time. Eight presets cover the most common looks — Vintage warms the tones and adds slight sepia, Drama cranks contrast to 150% for bold poster-style output, Cool shifts the hue into blue territory, B&W collapses saturation to zero. Each preset sets the six manual sliders simultaneously, so you can dial them in further after applying one.
The filter string is live CSS. Hit Copy as CSS and you get a ready-to-paste property like filter: brightness(95%) contrast(90%) saturate(80%) sepia(20%); — drop it into any stylesheet and your image renders with the exact same look. When you click 📥 Export with Filters, the tool draws the filtered SVG onto a Canvas and saves a PNG with the effects baked in permanently.
🟢 Optimize Tab — What Each Action Does to Your SVG Bytes
SVGs exported from Illustrator, Figma, or Inkscape carry significant overhead. Metadata blocks, editor comments, Inkscape-specific attributes, and redundant IDs can account for 20–60% of the file size. The Optimize tab breaks the cleanup into four targeted actions:
- 🔵 Remove Comments — strips
<!-- ... -->blocks. Illustrator loves leaving version comments at the top of every export. - 🟠 Strip Metadata — removes
<metadata>,<desc>,<title>, and Inkscape/Sodipodi/Dublin Core attributes that browsers never use. - 🟣 Strip IDs — removes
id=""attributes that aren’t referenced by aurl(#...)anywhere in the file. Safe — it checks for references before removing. - 🔵 Full Optimize — runs all three passes then collapses whitespace. Typical savings on a Figma export: 35–55% size reduction with zero visual change.
The ViewBox Editor deserves its own mention. Rather than hunting for the viewBox attribute inside the code editor, you get four numeric inputs: min-x, min-y, width, height. Adjusting these crops and reframes the visible area of the SVG without touching any paths. It’s how you remove unwanted whitespace padding from an exported Figma icon without distorting the shapes.
For batch export, the three packs cover every common production need. The Favicon Pack exports six PNG sizes — 16, 32, 64, 180 (Apple Touch Icon), 192 (Android), and 512 pixels — all from a single click. The Social Pack covers OG 1200×630, Instagram 1080×1080, Facebook Cover 820×312, Twitter Header 1500×500, and a 400×400 profile photo. The Icon Sizes pack outputs the complete standard set from 16px to 256px. Each file downloads individually and automatically.
You can also try our Image Tools collection for additional conversion options, or read our guide on SVG file format best practices for deeper technical context on when SVG is the right choice for your project.
Does SVG Studio Pro upload my files to a server?
No. Every action runs entirely inside your browser using the Canvas API and JavaScript. Your SVG files never leave your device — there’s no server, no upload, and no account required. It’s fully offline-capable once the page loads.
What’s the maximum SVG size this tool can handle?
The tool handles SVGs up to several MB without issues. The main limit for rasterization is available GPU/Canvas memory — most modern devices can render at 4096×4096 or higher. Very large or highly complex SVGs with thousands of paths may take a few seconds to render.
Why does the Vectorizer output look pixelated?
The built-in vectorizer uses Canvas edge detection — it traces pixels, not mathematical curves. For best results, use high-contrast source images (logos, icons, illustrations) and experiment with the Edge Threshold slider. Complex photos with gradients won’t vectorize cleanly with any pixel-tracing approach.
Can I use the exported PNG files commercially?
The tool itself places no restrictions on exported files. Commercial use rights depend entirely on the license of the original SVG you uploaded. If you created the SVG yourself or own its license, you can use exports however you need.
How does the Color Replace work on gradients?
The Color Palette Extractor scans fill, stroke, and stop-color attributes for hex values. When you replace a color, it does a string replace across the entire SVG source — so gradient stops using that hex get updated too. It handles both attribute-style and inline CSS-style color declarations.
What does Full Optimize actually remove?
Full Optimize runs four passes: strips HTML comments, removes metadata and editor-specific attributes (Inkscape, Sodipodi, Dublin Core), deletes unreferenced ID attributes, then collapses all whitespace. It never modifies paths, shapes, colors, or gradients. Typical savings are 30–55% on Figma or Illustrator exports.
Does the JSX export work with React and Next.js?
Yes. Copy as JSX converts all hyphenated SVG attributes to camelCase — strokeWidth, fillRule, clipRule, stopColor, stopOpacity — which is what React’s JSX syntax requires. Paste the output directly into a React component or Next.js page.
Why use WebP instead of PNG for the output?
WebP is typically 25–35% smaller than PNG at equivalent visual quality. For web use — especially OG images, thumbnails, and social assets — WebP loads faster and improves Core Web Vitals. All modern browsers support it. Use PNG when you need guaranteed compatibility with older tools or email clients.
Can I apply filters before exporting to PNG?
Yes. Go to the Filters & FX tab, set your preset or adjust the sliders, then click 📥 Export with Filters. The tool renders the SVG through a Canvas with the CSS filter applied and bakes the effect permanently into the exported PNG. The filter CSS string is also copyable for use in stylesheets.