How to Record Your Screen and Webcam Directly from Your Browser
Discover how to securely record your screen, webcam, and microphone locally. Use our free screen recorder with a built-in video trimmer today.
Table of Contents
Free Online Screen Recorder — Record 4K, Webcam & Audio in Your Browser
No download. No sign-up. The browser’s built-in screen capture API handles everything — full screen, application window, or single tab. Add your webcam, mic, system audio, and a custom watermark. Stop when done, then trim and export to MP4 or WebM directly inside the page.
Last updated: June 2026
🔴 What Is Browser Screen Recording — And Why It Works Without an App
Screen recording used to mean installing software. OBS, Camtasia, ShareX — all desktop apps that hook into the OS at the driver level. That changed with the W3C getDisplayMedia() API, shipped in Chrome 72 in 2019. Modern browsers can now request direct access to your display output through a sandboxed, permission-gated interface — no driver, no admin rights, no installation.
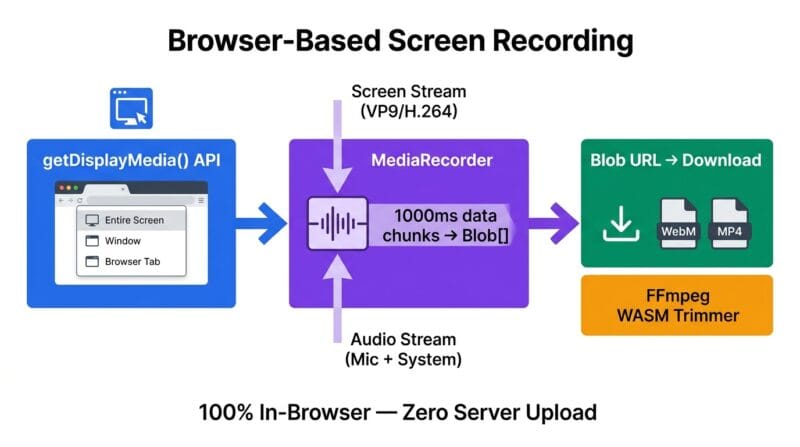
The key difference from installed software is the permission model. When you click Start Recording in this browser screen recorder, the browser opens a native OS dialog — drawn by Windows, macOS, or Linux itself, not by any webpage code. You see your display surfaces listed: Entire Screen, specific application Windows, and Browser Tabs. You pick one, confirm, and the stream starts. A webpage can never access your screen without that explicit user gesture. The OS blocks it at the system level.
🔴 How getDisplayMedia() Captures Your Screen
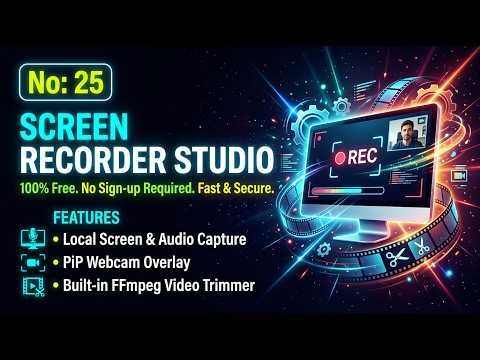
The MDN getDisplayMedia specification defines exactly what the browser can and cannot access. The API returns a MediaStream object containing one video track — the display surface you selected — and optionally an audio track if you checked Capture System Audio. That stream feeds directly into a MediaRecorder instance. Every 1000ms, the recorder fires a dataavailable event pushing a chunk of encoded video into an array. Stop the recording, and those chunks merge into a single Blob. A temporary blob:// URL points to it in memory — click Download, and the browser writes it to your disk.
Audio mixing runs in parallel. System audio comes from the displayMedia request itself — tick Capture System Audio and the browser includes the output audio from your selected surface. Microphone audio is a separate getUserMedia() call with echoCancellation: true and noiseSuppression: true applied automatically. Both streams are combined into one MediaStream before recording starts. This is why headphones matter: without them, the mic captures your speaker output and you get an echo loop that ruins the audio track.
🟡 Webcam Picture-in-Picture — How It Works and What Gets Recorded
The webcam PiP overlay runs as a second simultaneous getUserMedia() stream. Tick Webcam PiP Overlay, and the tool requests {video: true, audio: false} — audio is explicitly excluded to avoid duplicating the microphone input already captured in the main stream. The webcam video feeds into a circular <video> element positioned absolutely over the screen preview. Four position options — top-left, top-right, bottom-left, bottom-right — change a CSS class on the element instantly without reinitialising the stream.
Here’s something most users miss. The webcam circle in the browser preview is a CSS overlay — it is not composited into the recorded video file. MediaRecorder captures only the screen stream. The webcam element floats above the preview in the browser UI only. To get your face permanently burned into the recording, open your webcam in a floating window on your desktop and position it somewhere on-screen before starting the full-screen capture. The recorder then sees it as part of the screen content naturally. Our Video Merger & Trimmer tool can combine a separately recorded webcam clip with a screen recording if you need frame-accurate compositing after the fact.
🟢 WebM vs MP4 — Which Format Should You Choose
The format selector controls the MediaRecorder MIME type. WebM VP9 produces the smallest files — roughly 3–8 MB per minute at 1080p for screen content like code editors or documents. Fast motion content (video games, animations) will be larger. MP4 H.264 is available as the capture format and also as the trimmer export path.
- 🔵 WebM VP9 — best for uploading to YouTube, Google Drive, or sharing on the web. Chrome, Firefox, and Edge play it natively. Smallest file size for equivalent quality.
- 🟠 MP4 H.264 (trimmer export) — essential if you need the file to open in VLC, Windows Media Player, or video editors like DaVinci Resolve or Premiere Pro. The trimmer re-encodes with
-pix_fmt yuv420p, which fixes the green-tint or black-screen bug that appears when chroma subsampling is wrong. - 🟣 Stream copy (WebM trim) — if you trim and export as WebM, FFmpeg uses
-c copyto cut at keyframe boundaries without re-encoding. Very fast, but trim accuracy is limited to I-frame positions — the actual cut may land up to half a second away from your specified time.
🟡 The Built-in Video Trimmer — FFmpeg WASM Inside Your Browser
The trim feature does not use a JavaScript slice operation. It runs FFmpeg — the same engine used in professional broadcast production pipelines — compiled to WebAssembly and loaded directly in the browser tab. On first use per session, the browser downloads the FFmpeg WASM core (~30MB). This is cached for the session. After that, every trim operation runs offline — no data leaves your device at any point.
Click “✂ Trim Video” after stopping a recording. The player loads your recording and auto-fills the End Time field with the exact duration. Set your Start and End times in MM:SS format. Choose your export format — MP4 for compatibility, WebM for speed — and click “⚙ Process Trim.” The FFmpeg log panel shows real-time progress. When processing completes, the trimmed video loads into the preview player automatically and the Download Trimmed button appears. The full workflow — record, trim, download — never requires leaving the page or touching a server.
🟢 Session History and Custom Watermark
Every recording you make in the same browser session stacks in the Session History panel in the sidebar. Each entry shows the take number, duration, and file size — useful when recording multiple takes of a tutorial and picking the best one. The download button on each history entry stays live until you close or refresh the tab. After that, the Blob URLs are revoked and the data is gone — always download your keeps before closing.
The watermark field lets you type any text — your domain, brand name, or channel handle. It updates the overlay in real time as you type. Untick “Show watermark” to hide it entirely for a clean recording. The watermark appears as a semi-transparent text element in the bottom-right of the preview — it is rendered as a CSS overlay on the browser preview only, not burned into the video file itself, for the same reason as the webcam overlay. To embed it permanently, record your full screen including the browser preview area while the watermark is visible on screen.
🟡 Privacy and Security — What This Tool Can and Cannot Access
getDisplayMedia() is sandboxed at multiple levels by design. The API requires an explicit user gesture — it cannot be called on page load or silently by a script. The OS picker dialog is drawn by the operating system itself, not by the webpage, so it cannot be spoofed. The browser enforces that the user sees a persistent sharing indicator (the toolbar notification showing what is being shared) for the entire duration of the capture. You can end sharing at any time by clicking Stop Sharing in that browser indicator.
One real privacy consideration: system audio capture in Chrome on Windows captures the audio output of every running application — not just the one you’re recording. If a notification plays, a background call rings, or sensitive audio from another app plays during recording, it will be in the file. Best practice: mute all non-essential applications, close communication apps, and use a dedicated browser window for the recording session. Use our Screen Recorder Studio with this workflow and you have full control over every captured input with zero data ever touching a server.
Does browser screen recording work without installing anything?
Yes. The getDisplayMedia() API is built into Chrome 72+, Edge 79+, and Firefox 66+. No extension, plugin, or desktop app required. Open the page, click Start Recording, pick your screen source from the browser dialog, and you’re capturing immediately.
Can I record system audio and microphone at the same time?
Yes — tick both Capture System Audio and Record Microphone before starting. Both streams merge into the same recording. Use headphones during recording to prevent the mic from picking up speaker output and creating an echo loop in the final audio track.
Why won’t my recorded file play in VLC or Windows Media Player?
WebM VP9 files sometimes lack the codec support in older media players. Open the built-in Video Trimmer, keep the full duration, select “MP4 H.264 — Best Compatibility,” and click Process Trim. FFmpeg re-encodes the file to a universally supported format that opens in every media player without extra codecs.
Is there a maximum recording length?
No hard time limit exists in the tool. The real limit is your device’s available RAM — video chunks accumulate in browser memory during capture. A 1080p recording of static screen content (code, documents, slides) uses roughly 3–8 MB per minute. Most modern devices handle 30–60 minute sessions without issue.
Does the webcam bubble get embedded into the recorded video file?
No — the webcam PiP is a CSS overlay on the browser preview only. The MediaRecorder captures the screen stream, not the browser UI. To embed your webcam permanently, open it in a floating window on your desktop and position it on-screen before starting full-screen capture — it then appears naturally inside the recorded content.
What happens to my recording if I close the browser tab?
All recordings are Blob URLs stored in browser memory. Closing or refreshing the tab permanently destroys them — there is no server backup or auto-save to disk. Always click Download before navigating away. The Session History sidebar shows every take from your current session so you don’t accidentally miss one.
Can I record just one browser tab instead of my whole screen?
Yes. When the screen picker dialog opens, switch to the Tab section and select the specific tab you want. Tab capture is great for recording browser-based tutorials without exposing your desktop. Note that tab capture does not include system audio — only the audio from within that tab is available alongside the microphone.
Does this screen recorder work on Safari or iPhone?
Safari on macOS supports getDisplayMedia from version 13+ with limited audio. Safari on iOS does not support screen capture at all — Apple restricts the API on mobile. Use Chrome, Edge, or Firefox on a desktop or laptop for full functionality including webcam PiP, system audio, and the FFmpeg trimmer.
Is my screen recording data private — does anything get uploaded?
Nothing is uploaded. The entire pipeline — capture, chunk storage, Blob assembly, FFmpeg trimming — runs inside your browser tab. You can verify this in Chrome DevTools: open the Network tab, start and stop a recording, and you will see zero POST requests or file uploads at any point during the process.